
Welcome to the ultimate Star Fox 64 3D Walkthrough! Get ready to embark on an exhilarating space adventure with Fox McCloud and his team as you pilot your Arwing through intense intergalactic battles. In this detailed guide, we’ll equip you with everything you need to master the game, from Understanding Basic Controls and Navigating Different Levels to discovering Key Locations and Their Challenges. Learn how to utilize Arwing Abilities Effectively and develop winning Strategies for Boss Battles. Buckle up, space pilot – it’s time to defeat Andross and save the Lylat System!
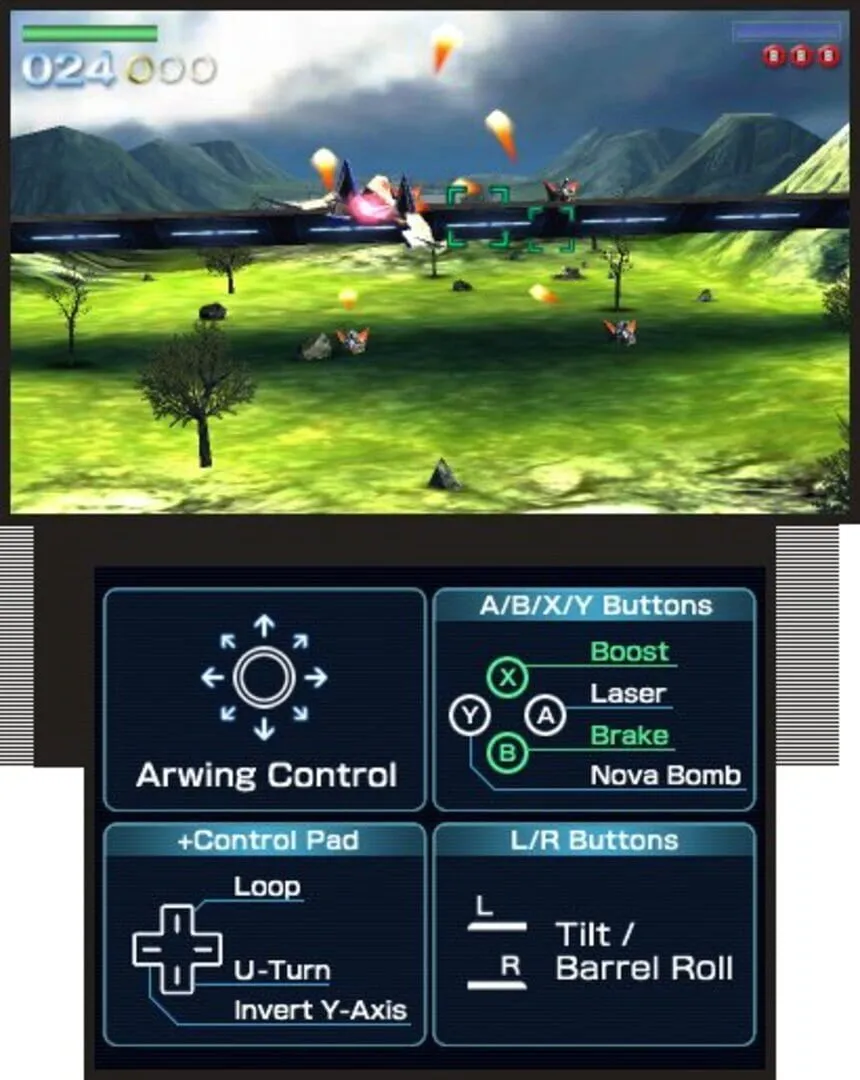
Understanding Basic Controls
If you’re diving into Star Fox 64 3D for the first time (or just need a refresher), understanding how to control your Arwing is crucial for dominating the Lylat System. The game seamlessly blends action with intuitive controls, making it accessible for both newcomers and veterans. Let’s break down the essentials to get you flying like a pro.
The Basics
Here’s a quick list of the primary controls you’ll be using:
- Circle Pad: Move your Arwing up, down, left, or right. Think of it as the steering wheel of your ship.
- A Button: Fire your lasers. You’ll use this a lot!
- B Button: Fire your bombs, which are perfect for dealing with crowds or tougher enemies.
- Y Button: Boost. Use it to chase down enemies or quickly get past obstacles.
- X Button: Brake. Slow down to line up shots or dodge attacks.
- R/L Buttons: Barrel roll. Useful for dodging enemy fire and deflecting certain attacks.
- 3D Slider: Adjusts the 3D depth. This is more about your personal preference for visuals.
Advanced Maneuvers
To become truly proficient, you’ll need to master some advanced techniques. These moves will help you outmaneuver your enemies and navigate through tricky spots.
- Somersault: Down + Boost + Y Button. This allows you to loop over enemies or obstacles. It’s great for shaking off foes that are tailing you.
- U-Turn: Down + Brake + Y Button. Perfect for sharp turnarounds when you’ve flown past enemies or need to quickly change direction.
- Bomb Detonation: Tap the B Button again after launching a smart bomb to detonate it prematurely. Timing is key for maximizing damage.
HUD Elements
Understanding your screen layout is just as important as knowing the controls. Here’s what you’ll see:
- Health Bar: Located in the bottom left. Keep an eye on it; when it runs out, it’s game over.
- Radar: Shows your enemies and objectives. Use it to keep tabs on where you need to go.
- Special Meter: This indicates your bomb inventory and charge status for powerful attacks. Run out of bombs, and you’ll have to rely on your lasers.
Tips and Tricks
- Lock-On Shots: Hold the A Button to charge up, then release to fire a powerful homing shot. This makes taking down fast-moving targets easier.
- Collect Power-Ups: Look for rings to refill health and special weapons to upgrade your firepower.
- Environmental Awareness: Certain paths and secrets can give you strategic advantages, so keep your eyes peeled for branching routes and hidden items.
Final Thoughts
Getting comfortable with these controls will make your missions smoother and more enjoyable. Practice makes perfect, so spend some time in the Training Mode if you need to. Mastering these basics sets the foundation for more advanced strategies and tactics. Now, get out there and show Andross who’s boss!
If you need more in-depth strategies, be sure to check out our other sections on mission tips and enemy breakdowns. Fly high and good luck, Ace!
Navigating Different Levels
Navigating the various levels in Star Fox 64 3D can seem tricky at first, but with a bit of practice and some helpful tips, you’ll be saving the Lylat System in no time. Each level has its own unique challenges and enemies, and learning how to maneuver through them effectively will give you a big advantage. Let’s break down some key points you want to keep in mind for different levels.
1. Corneria: The Starting Point
Corneria serves as your intro to the game’s mechanics. Here, you’ll want to focus on mastering the basic controls like barrel rolls, bombs, and charge shots. Watch out for these:
- Turrets and Ground Units: They shoot straight. Fly high to avoid their fire and shoot them from above.
- Gold Rings: Collect 3 to extend your health meter. They are often hidden, so keep an eye out.
- Alternate Path: Near the end of the level, if you save Falco by shooting the enemies on his tail, he will guide you through a waterfall to a different boss. This path affects which levels you unlock next.
2. Meteo: A Rock-Filled Challenge
Meteor showers and asteroid belts make Meteo one of the trickier levels. Here, you’ll need quick reflexes:
- Asteroids: Some are destructible. Use charged shots to clear paths.
- Boosts and Brakes: Use these to navigate tight spaces and avoid sudden obstacles.
- Warp Zone: When you see the series of blue rings, fly through all of them to warp ahead to a different level.
3. Sector Y: Space Ambush
This level is a good test of your combat skills. Enemies come at you in waves:
- Formations: Shoot enemies in formations to get power-ups. They drop helpful items when destroyed together.
- Stealth Fighters: These guys cloak and uncloak. Charge shots can help take them down quickly.
- Route Choices: Depending on your performance, you might branch to different levels. Defeat enough enemies to set yourself up for an optimal path.
4. Aquas: Underwater Warfare
Aquas is unique because you’re piloting the Blue-Marine submarine:
- Torpedoes: Use these liberally. They home in on enemies and light up dark areas.
- Bioluminescent Fish: These guide your way in the dark but can also be dangerous if not handled quickly.
- Avoiding Obstacles: Unlike in Arwings, you can move in all directions. Use this to dodge mines and other underwater threats.
5. Katina: Protect the Base
Here, you need to help defend a base under siege:
- All-Range Mode: Fly freely in a 3D space to take out enemies attacking the base.
- Support Ships: Protect them; they’ll assist with firepower and items.
- Mother Ship: Focus fire on the core when it appears. Ignore the smaller enemies temporarily to land more hits.
6. Solar: Heat Hazard
Solar is literally a hot mess:
- Health Drain: The sun’s surface will continuously drain your health. Fly high to minimize damage.
- Coolant Rings: Look for silver rings; they recover more health here than usual.
- Boss Tactics: Focus on dodging. Many of the boss’s attacks lack complex patterns, but steering clear is essential.
7. Zoness: Toxic Waters
Navigating Zoness requires sharp shooting:
- Spotlights: Shoot them out to avoid alerting the enemy. Missing one can change your route.
- Pollution: Fly over cleaner paths to avoid damage.
- Precision: This level requires careful aim and timely triggers. Focus on accuracy.
8. Macbeth: The Train Chase
Macbeth is all about blowing up a train:
- Switches: Near the end, shoot the eight switches to trigger a hidden path for a special ending.
- Ramming Attack: Trains will try to ram you. Use the boost to avoid them.
- Explosibles: Destroy enemy turrets and machines on the train to reduce incoming fire.
9. Venom: The Final Stand
Venom comes in two flavors, depending on your path:
- Easy Route: Navigate through tunnels and destroy Andross’ decoy.
- Hard Route: Face tougher enemies and a harder Andross form.
Whichever path you end up on, remember that charged shots and barrel rolls are your friends. Keep practicing these strategies, and you’ll master the skies of Star Fox 64 3D in no time!
Key Locations and Their Challenges
Flying through the Lylat System in Star Fox 64 3D? You’ve got a lot of space to cover, each with its own set of challenges. Let’s break down the key locations and what to expect when you get there.
Corneria: The First Frontier
Corneria is your starting point, and it’s all about teaching you the ropes. You’ll face some basic enemies and get familiar with your Arwing’s controls. Watch for the boss, Granga, who’ll be your first real test. Pro tip: take out his legs first to make the fight easier.
Challenges:
- Dodge incoming laser fire.
- Learn to use the barrel roll effectively.
- Beat Granga once you figure out his pattern.
Meteo: The Meteor Field Gauntlet
Next stop is Meteo. It’s a meteor shower maze, so stay sharp! The flashing lights and debris make it hard to see sometimes. At the end, face a giant rock crusher, Goregranga. Use bombs wisely to clear the field when things get dicey.
Challenges:
- Navigate through tight spaces between meteors.
- Deal with enemy swarms while avoiding asteroids.
- Destroy Goregranga before it crushes you.
Sector Y: Galactic Space Battle
In Sector Y, you’ll find your first major space battle. You’ll be up against a ton of enemy fighters, so keep an eye on your allies. They tend to get into trouble here. The boss, a giant robot named Shogun, is tricky. Aim for its arms to disable its attacks.
Challenges:
- Maintain formation and protect your team.
- Dodge laser barrages from enemy fighters.
- Defeat Shogun by targeting its weak points.
Katina: The Independence Day Battle
Katina feels like you’re in the movie “Independence Day.” You’ll aid your buddy Bill while taking down saucers and defending against waves of enemies. Keep moving and take down the giant saucer by destroying four hatches and then hitting its core.
Challenges:
- Protect Bill’s base by taking down enemies fast.
- Destroy each saucer hatch to expose the core.
- Target the core before it escapes.
Solar: Lava Planet Nightmare
Solar is as hot as it sounds. Lava is everywhere, and it’s slowly roasting your Arwing. Keep moving and collect rings to restore health. The boss here is Vulcain, a lava monster. Shoot its core when it rises from the lava.
Challenges:
- Manage your heat levels by collecting health rings.
- Avoid lava geysers and enemy fire.
- Take down Vulcain quickly to avoid overheating.
Macbeth: The Extreme Railway Mission
On Macbeth, you’ll battle on a train track. Timing is everything here. Hit switches to change the track and derail the train into the base for massive destruction. The boss is the train itself, with turrets and missile launchers galore.
Challenges:
- Destroy track switches to change the train’s route.
- Target weak points on the train cars.
- Hit the final switch to send the train into the enemy base.
Area 6: The Defense Grid
Area 6 is the last line of defense before Venom. It’s packed with enemies, missiles, and satellites. Stay alert! The boss is Gorgon, a massive warship. Its weak spot is the core, exposed when it shoots.
Challenges:
- Dodge heavy fire from missiles and satellites.
- Focused fire on enemy weak points.
- Take down Gorgon by hitting its core when vulnerable.
Venom: The Final Showdown
Venom is Andross’s turf, and it’s time for the final showdown. The planet is crawling with enemies. You’ve got two paths here; if you fight Star Wolf first, you’ll face the true form of Andross, which is much tougher.
Challenges:
- Survive an onslaught of elite fighters.
- If facing Star Wolf, take out their entire team.
- Defeat Andross by targeting his eyes and brain.
Each location has its own vibe and set of obstacles. Keep these tips in mind, stay sharp, and you’ll save the Lylat System in no time. Happy flying! 🚀
Using Arwing Abilities Effectively
Mastering the Arwing’s abilities is key to becoming an ace pilot in Star Fox 64 3D. This guide will break down each ability, explain when and how to use them, and give tips to keep your ship in top shape. Ready to blast through the Lylat System? Let’s dive in!
Barrel Roll: Your Best Friend
How To
- Press “L” or “R” twice quickly.
When To Use
- When there’s incoming fire.
- To deflect weak enemy shots.
Tips
- Don’t spam; time your rolls when you see bullets or lasers coming.
- Use it to collect any loose items floating around quickly.
The barrel roll is like your Arwing’s personal shield. You’ll get a lot of enemy fire in your face, and a quick roll can save you from taking damage. Plus, it can help grab those pesky rings and power-ups.
Boost and Brake: Speed Control
Boost
- Hold “X”.
Brake
- Hold “B”.
When To Use
- Boost to dash through tricky spots or catch up to enemies.
- Brake to dodge fast-moving obstacles or slow down to make precise shots.
Tips
- Mixing both can help you weave through tight enemy formations.
- Use boost sparingly; it drains your energy meter.
Boosting and braking give you precise control over your speed. Need to dodge that asteroid? Hit that boost! An enemy boss leaving mines behind? Slam on the brakes and swerve out of harm’s way.
Loop and U-Turn: Tight Maneuvers
Loop
- Press “C-Stick Up”.
U-Turn
- Press “C-Stick Down”.
When To Use
- Loop to dodge shots or get behind enemies.
- U-Turn in all-range mode to quickly face the action again.
Tips
- Loops should be used to break away from a sticky situation.
- U-turns are lifesavers in dogfights; don’t forget this move exists!
Loops and U-turns are all about getting the upper hand. They are vital in evading powerful attacks and positioning yourself strategically. Remember, with great loops comes great dodging ability!
Charged Shot: Precision with Power
How To
- Hold “A” to charge, then release.
When To Use
- Against enemies clustered together.
- On tougher foes with more health.
Tips
- Lock on by holding your charge over an enemy.
- Timing matters; use it between dodges and evasive maneuvers.
A charged shot can take out multiple enemies if they’re close together. It’s perfect for those moments when you want to clear the screen quickly or deal hefty damage to a tougher enemy. Charge, aim, fire!
Bombs: Clearing the Way
How To
- Press “Y”.
When To Use
- When swamped by too many enemies.
- On bosses to deal massive damage.
Tips
- Save bombs for boss fights or large enemy formations.
- Don’t waste them on single targets unless absolutely necessary.
Bombs provide giant explosions that can clear the screen. Be smart with your bombs—they’re limited, so use them when you’re in a tight spot or desperately need to deal heavy damage. Also, keep an eye out for bombs dropped by enemies.
Repair and Upgrade: Stay in Top Form
How To
- Collect rings and upgrade items.
When To Use
- Whenever you see them!
Tips
- Gold rings are crucial; collect three to increase your shield gauge.
- Look for laser upgrades to boost your firepower.
Repairs and upgrades keep your Arwing fighting fit. Grabbing every golden ring you can find increases your durability, and the dual laser upgrades ramp up your firepower, turning your Arwing into a force to be reckoned with.
Using these abilities effectively will make your journey through the Lylat System smoother, more exciting, and ensure you’re prepared for whatever Andross throws your way. Get out there, pilot, and show them what you’re made of!
Strategies for Boss Battles
So, you’ve made it to the bosses in Star Fox 64 3D? Awesome, now let’s make sure you get through them in one piece! Boss battles in this game can be tricky, but with the right strategies, you’ll blast through them like a pro. Here’s a breakdown of tips and tactics for each major boss you’ll encounter.
Corneria - Attack Carrier
Overview: The boss of Corneria is the Attack Carrier, a large ship with a weak spot in its center.
Strategy
- Hit the Yellow Spots: Start by focusing on the yellow glowing weak spots on its sides. Dodge its laser fire and keep moving to avoid getting hit.
- Watch for the Cranes: It will deploy cranes to grab you. Shoot these down as quickly as possible to avoid damage.
- Open for Attack: Once the side weak spots are down, the central core of the Carrier will open up. Unload everything you’ve got into this core while keeping an eye out for any remaining cranes and lasers.
Sector X - Spyborg
Overview: Spyborg is a giant, mechanical creature that’s tough to miss.
Strategy
- Shoot the Arms: Start by focusing your attacks on its arms. When it gears up to punch you, perform barrel rolls (R or L buttons) to deflect the blows.
- Dodging Beams: It will fire beams from its eyes, which you can dodge by boosting out of their way (Y button for boost).
- Go for the Core: After you destroy its arms, Spyborg will be more vulnerable. Focus on its core to really deal some damage while evading the eye beams.
Macbeth - Mechbeth
Overview: Mechbeth is a train-based boss that is on tracks, which offers some unique challenges.
Strategy
- Target Cars: Shoot at each individual car of the train to progressively weaken it.
- Control the Switches: Aim for the lock switches above the tracks. Hit all eight switches to trigger an alternate cutscene where the train will crash into a building, instantly defeating Mechbeth.
- Final Assault: If you don’t hit all the switches, you’ll face Mechbeth head-on. Use your bombs and lasers to attack the weak points on the engine while avoiding its attacks.
Venom - Andross
Overview: The primary antagonist, Andross, is waiting for you on Venom. He’s a big head with hands and knows a few tricks.
Strategy
- Hands First: Andross will use his hands to block your shots and punch at you. Destroy his hands first to make him vulnerable.
- Dodge and Shoot: After the hands are down, he’ll begin shooting lasers and doing a swallowing attack. Use your barrel rolls to dodge and fire at his eyes.
- Roll Through the Mouth: When he tries to swallow you, roll through his mouth to avoid damage and keep firing.
- True Form: Once you’ve beaten the mechanical face, he reveals his true form (a brain). Focus on the eyes first, and then shoot the core, all while dodging his tendrils and energy attacks.
Optional Boss - Star Wolf
Overview: Star Wolf shows up a couple of times and they’re just as skilled as your team.
Strategy
- One at a Time: Target one member of Star Wolf at a time, improving your chances of taking them down quickly.
- Keep Moving: Keep your ship moving constantly to avoid their attacks. Use rolls and evasion tactics often.
- Team Help: If you get a bogey on your tail, call for help from your team by pressing down on the D-pad. They can help shake off enemies.
Remember, practice makes perfect! Don’t be discouraged if you don’t get it right the first time. Good luck, and may the star paths stay clear for you, Star Fox!